My LAST POST showed what the hand plane looked like out of the box. This post shows what the plane was able to do.
While setting up the plane, I took note of the slop in the lateral- and depth-adjusters. The depth adjuster had 3/4 of a turn of slop and the lateral adjuster had a little side-to-side play.

I honed the bevel up to 15,000-grit on a Shapton stone. This process took about two minutes. I then reassembled the plane and surfaced a board of beech. This was the reflection I saw when I looked down the board’s length.

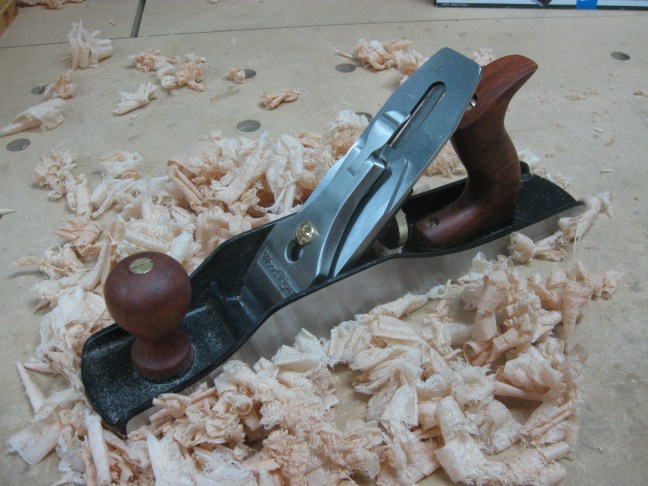
The plane made shavings like these.

To further increase the performance of the plane, I then lapped the back of the blade. It took 12 minutes to bring the blade to this degree of flatness. At this stage, the blade was flat enough to be usable, but there was still a large hollow in the center.

Six more minutes of lapping erased the hollow and I was able to bring up the polish.

I then reinstalled the blade and surfaced the beech board once again. The polish of the planed board after having lapped the back was noticeably better.

I took this shot for fun.

Remember the grease I wiped off as soon as I got the plane? Within a week of returning home to the Westcoast, I found that the sole already had rust spots. I cleaned the rust off and applied a coat of Boeshield, something I should have done right away.


Interesting to see a iron back with a hollow in the center, I would like to run into more cutting tools like that, easier to prep for use.
You really have not stated if you think this was good value for the money spent. Are you undecided at this point?
Garth,
Based on my experience with this plane, I would absolutely recommend the plane. It is a solid performer at an excellent price.
Chris
I like your review Chris. You didn’t mention anything about checking the flatness of the sole tho. Did you? It seems to me that this plane may be “decent” but still appears to have needed quite a bit of work to get working really nicely. At least it’s capable of getting there tho. The slop in the depth adjuster would be a bit of a concern IMO.
I checked the flatness of the sole from toe-to-heel both parallel and corner to corner. I was unable to slip my finest (0.002″) feeler gauge in anywhere.
I don’t think that very much work was required to get it working nicely at all. The work was actually very minimal. The biggest difference between this plane and premium planes like those from Veritas or Lie Nielsen is that the blade did not come lapped flat.
Chris
Great review Chris, would you buy another WoodRiver plane? Why or why not? If you would, which one? What planes are you used to buying?
Bob,
Most of my bench planes are new Veritas or antique Stanleys (one Miller Falls too). Based on functionality, I would buy another Woodriver plane. This one is a solid performer at an excellent price.
Which one would I buy? Whichever plane fit my needs. I do believe, with the addition of this WoodRiver #5, I have one plane of each size that WoodRiver makes (but only one, the #5, is WoodRiver).
Chris
Good review, it reaffirms what we knew about the WR V3 planes from other reviews published in various magazines, but you provide details that they don’t.
Although I don’t plan to own any WR planes, they are the planes I’d recommend to my beginner friends who have budget consideration. It’s better for them to start using planes early with one of the WR planes or two than wait till they can afford a Veritas or LN plane. Not everyone needs to start with a Festool domino when they can start building projects with a dowel jig and still have money for other power tools.
Excellent review! You are a nit picker like me but not beyond accepting a product with a wart or too that can benefit from a little TLC! It’s nice to know that I’m not alone. I’ve finally accepted the fact that I’m a compulsive tool collector. Since I have the entire line-up of vintage Stanley bench planes, and most of their specialty planes too, I’ve been planning to add the Bedrock series to the collection. The WR V3 planes are apparently based upon the Stanley Bedrocks and certainly resemble them. After reading your well reasoned, executed and articulated review of this product, these WR’s might be the way to get more “bang for the buck” to add the Bedrock style to my collection? (who am I kidding… I have 37 planes now and I’ll be adding BOTH the WR and Stanley Bedrocks! Oiiiy… where’s my medication!?!)
Hi Tauagon,
As I read your comment, I was thinking the same thing – someone like yourself who has the entire line-up of Stanley bench planes and most of their specialty planes isn’t going to settle with WoodRiver planes instead of Bedrocks. Do you use the #1 or #2 bench planes very often?
Chris
Hi Chris,
No… my favourite and often used is the #3. I think I’m up to 5 or 6 of ’em. My pride is a pristine version with an intact Stanley logo on the tote. The others are in a variety of conditions (although all restored and tuned) and different set-ups. Nuts… I know, but I’ve even set one up as a mini scrub plane with a heavily rounded blade and opened mouth for “scrubbing” small areas of rough lumber; and I’ve setup another #3 with a hand-filed, toothed blade to smooth small areas of extremely gnarly grain before scraping! (just had to make it!)
I enjoy “playing” with tools and machinery (I’m a welder and machinist by training; a cabinet maker, wood turner and gunsmith as hobbies) and restoring/modifying tools is a great form of relaxation when work and other hobbies become too stressful.
Do you have a favourite size hand plane… or other tool?
Cheers,
Mike
Tauragon,
What type of file did you use to tooth the blade? Did you need to anneal it first, then reharden it?
My favourite size of plane is the #4. I have at least four of them. One is set for a wide mouth and radiused blade, like a scrub plane. One needs to be tuned, and two others are nicely tuned and used for fine work.
Chris
Chris,
I experimented first on scrap blades that are beyond recovery from deep pitting (eBay pics don’t always reveal details!). I’ve acquired a large collection of files of various cut, quality and intended use. I also have specialty gunsmithing files purchased from Brownell, both for checkering wood and for filing hardened steel gun parts. I ground a file to have only a thin cutting edge and 2 “safe” sides (teeth removed) to prevent widening the gap as its being filed to depth. I coated the edge of the steel with machinists “blue” lay out dye and laid out the pattern with a sharp, carbide scribe using dimensions, measured with a digital caliper, from a LV toothed blade. The initial cuts were made with a very thin, triangle file in the centre of each gap and filed down to the depth registration. The gap was then widened and squared with the modified file. I also experimented with stones in a Dremel but maintaining the stone’s dimensions is difficult because they wear so quickly. I also used diamond coated grinding tips I got from my dentist. I settled on files after annealing the steel first. After shaping the teeth I hardened and quenched the steel followed by a third heating and quenching to draw the hardness down from being too brittle. I used oxy-acetylene as the heat source but propane or Mapp gas would work too.
Cheers,
Mike
Mike,
That sounds like a good approach and probably the method I would choose, if I ever needed to tooth a blade.
Chris
Nice, helpful review. Still thinking I might prefer to own An old Stanley bedrock instead, but it is a very nice plane.