

I have been experimenting with different types of joinery.
On my second prototype of a seating bench, I experimented with triple offset tenons and wedged triple offset tenons. I liked the cleanliness of the triple offset tenons but didn’t care for the complicating detail of the wedges. When a finish is applied, more soaks into the end grain, making it darker, further enhancing and highlighting the joint.
The triple tenon is a very nice joint, but for best effect I feel that each tenon should be at least twice as wide as it is thick. That requirement is limiting in furniture work as the design requires wide boards, which often doesn’t work with the design.
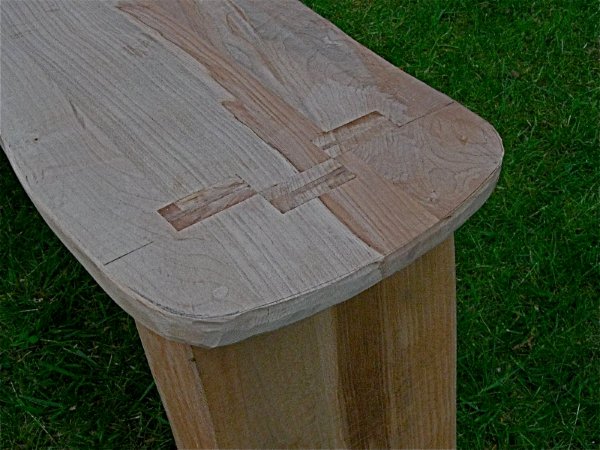
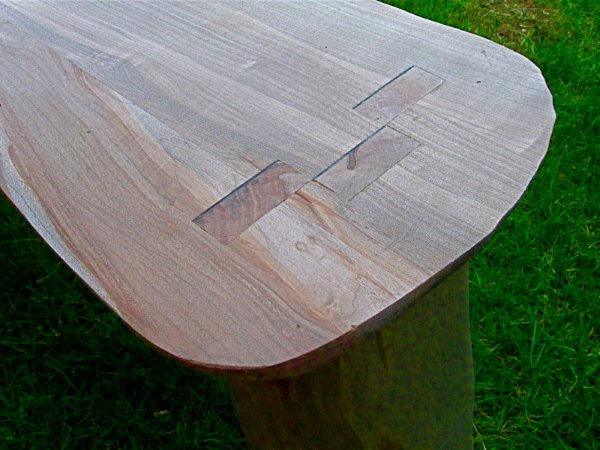
So I went back to the drawing board to come up with another type of joinery and came up with the quadruple tenons, arranged in a diamond shape.
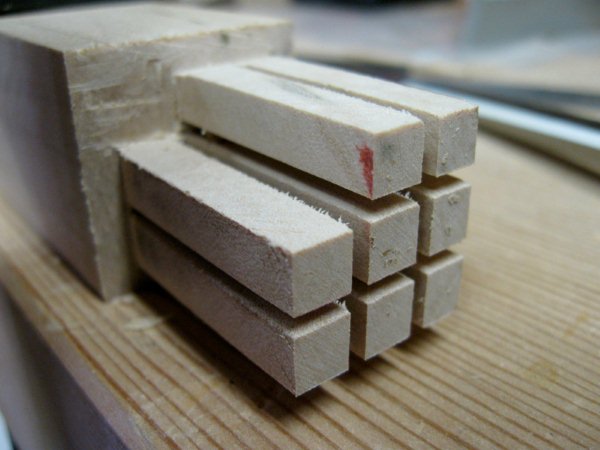
I started with 1-1/4″ square stock and cut them on the table saw. Using a thin-kerf blade, I made a series of cuts to form nine tenons. I intentionally set the blade a shade deeper than 1-1/4″ so that the tenons would protrude slightly from the mortises, making it easy to trim them flush after glue-up.
Moving to the work bench, chiseled away the four corner tenons as well as the center tenon. The corner tenons were simple to remove; the center tenons was a challenge because the four remaining tenons limited how I could approach it. So what I did was use a 1/4″ chisel to split the center tenon into multiple “splinters”. Then I used a pair of forceps to pull out each splinter.
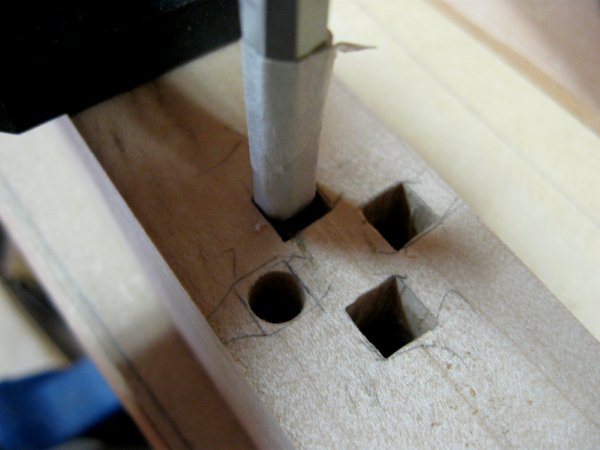
The next challenge, the harder part was to make matching mortises. I carefully positioned the tenons against the part to be mortised and transfered the locations with a marking knife. Then I moved to the drill press to drill out the majority of the waste before carefully squaring the mortises with a 1/8″ chisel, slowly sneaking up to the scribed line.
Initially, I had tried a 1/4″ chisel, but found that it was difficult to cut the full width of the mortise from a round hole. I could have used the 1/4″ chisel for the final cuts, but found it to be unnecessary. I dry-fitted the joint, then applied glue. To close up the joint, I applied a clamp with a specially made caul to bridge the proud tenons.
I later experimented with moving the tenons over to the edge, eliminating one of the shoulders. This makes the fitting slightly easier, as one mortise is open on one side, allowing it to be cut with a saw. It also exposes the joint from one side and highlight the joint.

Discover more from Products From The Mind of Chris Wong
Subscribe to get the latest posts sent to your email.
