

Handles (or totes, as they are called regarding hand planes) are often very personal things. Yet, I don’t think that any hand plane makers offer any options as to whether you would like a small, medium, or large tote for your plane. Perhaps that’s because the makers figure that the end user will either just adapt or modify the grips to fit.
For years, I’ve adapted. I’ve just gone on using the totes as they came. The totes were fine. Then I got acquired a Stanley #6. I tuned up the plane and really enjoyed using it… only my hand would cramp up after using it for even a short period of time. I did, however, like the angle of the tote more than the upright one on my Veritas #4 smoother. As the #4 is one of my most used planes, I decided to start there.
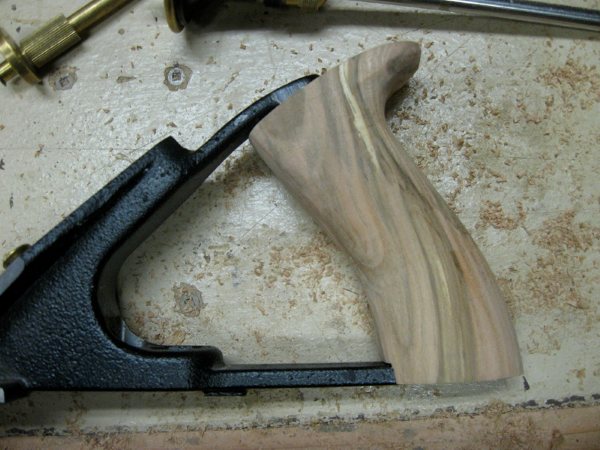
Wanting something nice, I dug through my stash of Pacific dogwood shorts and found a thick enough piece to make the tote from. I chose to orient the grain vertically, as opposed to horizontally as is done on most planes. The horizontal grain direction provides greater strength in long grain for the “horns” at the top and bottom of S-shaped totes used on Stanley planes, among others. Running the grain vertically would leave only short grain between the mass of the tote and the horns, so there would be a greater chance of them breaking off. The particular piece of dogwood I had actually had grain that ran in an S-shape, so I was able to make the tote’s grain run vertical without an issue.
I started by removing the existing tote and using it as a guide to determine where the holes needed to be drilled and what diameter they should be. After laying out the holes to be bored, I then sketched a rough outline of the shape I wanted to make the tote to be sure that it wouldn’t conflict with any of the holes.
I then headed over to the drill press and bored the required holes with the help of a tall fence quickly put together with 3D Squares and scrap plywood. I then used the bandsaw to cut out the tote.
The Veritas bench planes have a unique frog design which presents an additional challenge in making a tote – in order for it to fit, I needed to cut two mortises at either end of the tote to accept the cast frog. I simply used my chisels to cut the recesses and tested frequently until it fit.
Then came the fun part – shaping. I started using a broad carving gouge to remove the bulk of the waste, going cross-grain. Then I progressed to refine the shape with rasps. You know you have the right shape when it feels good in your hand. While I do not have large hands, I do appreciate larger handles. With a comfortable shape established, I further smoothed the surface with sandpaper.
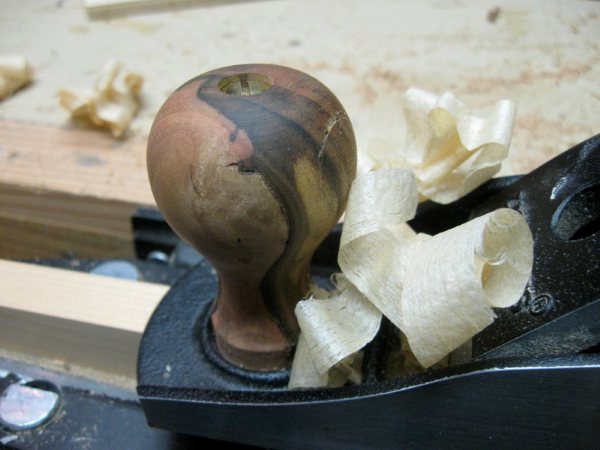
Now, you know there is no way that I could put a fancy new dogwood tote on the plane and leave the bubinga knob on the front. So I turned a matching dogwood knob. I even surprised myself at how closely I was able to duplicate the original.
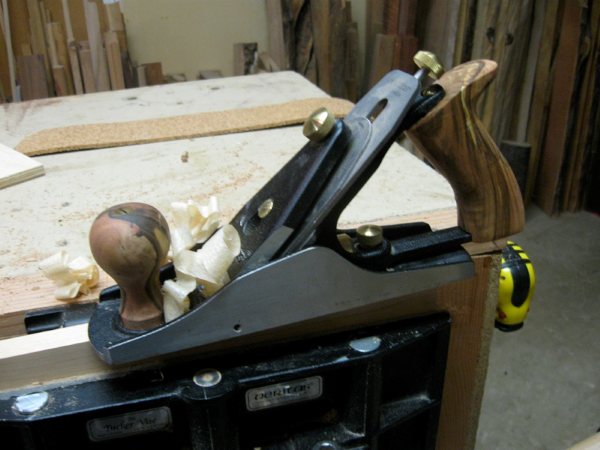
I finished the dogwood with a couple coats of polymerized tung oil. The oil really enhances the colour in the dogwood induced by spalting. The plane is definitely unique now, customized to fit my hand. It looks, works, and feels great. Next up will be the Stanley #6. I have some Pacific yew picked out for that.
Discover more from Products From The Mind of Chris Wong
Subscribe to get the latest posts sent to your email.

I have to say those are gorgeous pieces- part natural beauty, partly your work/execution (for whatever reason- the front knob is my favorite of the two). Really good call (IMO) on your decision to do a penetrating oil instead of a film finish. What beautiful wood … scrumptious actually.
Hi Pete,
Thanks for the compliment. Dogwood is one of my favourite woods to work and one of the prettiest too! Some of the handles I make get a coat of oil, others are left bare. I find both to be acceptable. Handles with thick, film-finishes look pretty but really aren’t that nice to hold. I even wrote an article on the subject! (https://flairwoodworks.com/2012/02/03/shiny-handles-suck/)
Chris
Chris – Wow. Your tote and bun combine beauty and utility in equal measure.