
")
On the morning of Sunday, April 15th, Morton and I exchanged ideas about trestle tables, spurred on by a recent sketch of a table on which he was working. That got me yearning to build a trestle table.
I documented my progress live on Twitter which was useful because each update had a time stamp so followers could see the rate at which I progressed. Here is a list of the previous Sessions:
Session 1 – Flat Boards are Boring;
Session 2 – Playing with Slabs;
Session 3 – From Two Slabs to One Table Top;
Session 4 – Clamping Odd Shapes and Sketching on Wood;
Session 5 – Routing Pockets for Battens;
Session 6 – Making Battens and Installing Countertop Connectors;
Session 7 – Installing Battens and Flattening the Underside; and
Session 8 – Make Your Tools Work for You and Flattening the Top.
(If you are not familiar with the format used on Twitter, every update, or “tweet” below starts with a username, being the author of that tweet. Sometimes, you see two or more usernames in a tweet. The second (and third, etc) usernames are preceded by a @ symbol and are people to whom the author is talking. The other symbol you see is #, which serves as a category. I try to remember to categorize all my tweets pertaining to this project under #flairww.)

FlairWoodworks I haven’t worked on the table for four days and I’m finally getting a chance to get back at it today! Follow along with #flairww. -2:24 PM Apr 30th, 2012
FlairWoodworks When I left off, I had just finished flattening the table top. Joinery between the two slabs comes next. #flairww -2:26 PM Apr 30th, 2012
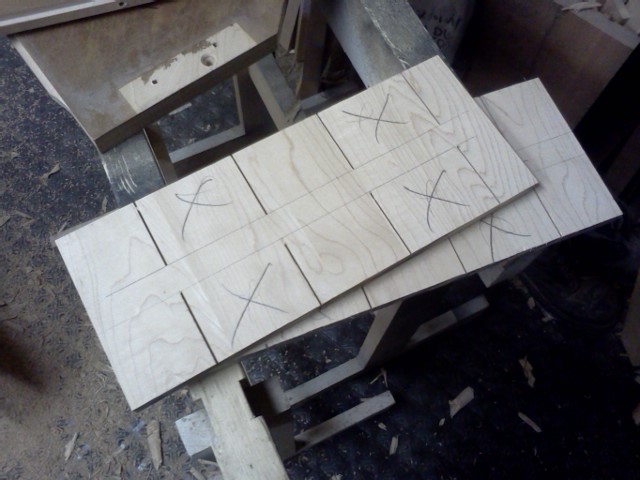
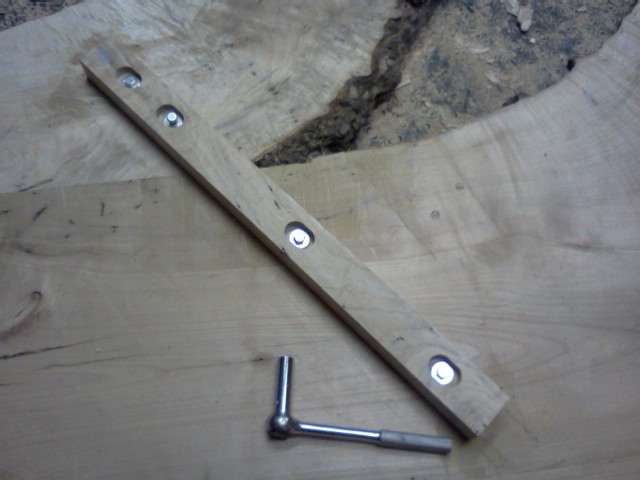
FlairWoodworks I’ve laid out on the faces where I want the mortises to be located. There will be three 3″-long mortises. #flairww -2:38 PM Apr 30th, 2012

FlairWoodworks Since I can use the same layout for the other side, I put pencil marks on my aluminum ruler. #flairww -2:41 PM Apr 30th, 2012

FlairWoodworks The layout of the second half was ridiculously easy. Now I need to flip over the top and separate the two halves. #flairww -2:44 PM Apr 30th, 2012
FlairWoodworks Maybe I should clean up some of these plane shavings first… #flairww -2:48 PM Apr 30th, 2012

FlairWoodworks Two bags of shavings! #flairww -2:55 PM Apr 30th, 2012

FlairWoodworks In the shavings, I found the transfer punch I’d used when I installed the battens. #flairww -2:57 PM Apr 30th, 2012

FlairWoodworks Well, that was kind of exciting. I didn’t break a horse, but I did knock over one. #flairww -3:02 PM Apr 30th, 2012
FlairWoodworks I’m using a socket adapter in my drill to quicky remove the lag bolts. #flairww -3:05 PM Apr 30th, 2012

FlairWoodworks They’re free! #flairww -3:09 PM Apr 30th, 2012

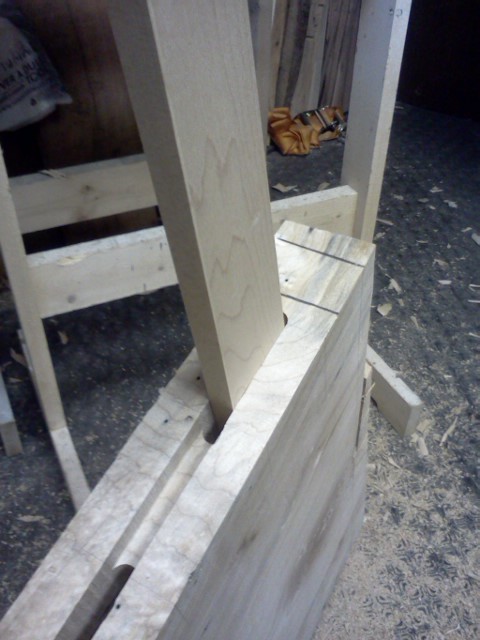
FlairWoodworks I’ll be using a plunge router to cut the mortises. This is easiest with the surface being mortised in the horizontal position (and the slab vertical). #flairww -3:13 PM Apr 30th, 2012

FlairWoodworks Had I been able to get a @FestoolUSA Domino XL, I could have easily cut the mortises with the slabs in the horizontal position. #flairww -3:14 PM Apr 30th, 2012
FlairWoodworks I cannot imagine using a stationary machine such as a horizontal boring machine/slot mortiser to mortise these slabs. #flairww -3:15 PM Apr 30th, 2012
FlairWoodworks I want really deep mortises and my Milwaukee plunge router has a greater plunge capacity than my Porter Cable. #flairww -3:17 PM Apr 30th, 2012

FlairWoodworks I used my saddle square to transfer the layout lines from the face to the edge. #flairww -3:21 PM Apr 30th, 2012

FlairWoodworks I use a large X to clearly mark which sections receive mortises. #flairww -3:22 PM Apr 30th, 2012

FlairWoodworks I clamped a straight piece of wood to the router’s base to act as a fence. #flairww -3:25 PM Apr 30th, 2012

FlairWoodworks Why? I’m not positive that the slabs are of even thickness so I am using the face as a reference surface. #flairww -3:26 PM Apr 30th, 2012
FlairWoodworks It’s the distance from the face to the mortise that is important. I used the CS-2 because I’d like them to be roughly centred.#flairww -3:27 PM Apr 30th, 2012
HalfInchShy @FlairWoodworks THAT’S where my CS-2 went! :-P Nice build; I’m having popcorn playing with Domizilla thinking how useful it would be #flairww -3:27 PM Apr 30th, 2012
FlairWoodworks @HalfInchShy Thanks :) I hope @BridgeCityTools makes you a new CS-2 soon! #flairww -3:28 PM Apr 30th, 2012
FlairWoodworks Because of the live edge, I moved the edge of one mortise. #flairww -3:40 PM Apr 30th, 2012

HalfInchShy @FlairWoodworks I like how you Xed out the X for the mortise. Is that a woodworking double negative? #flairww -3:53 PM Apr 30th, 2012
HalfInchShy @FlairWoodworks More seriously, are you going to use the router horizontally or have you mounted the slab vertically like you did before? #flairww-3:53 PM Apr 30th, 2012
FlairWoodworks @HalfInchShy I’ve got the slab clamped vertically to a sawhorse. #flairww -3:59 PM Apr 30th, 2012
FlairWoodworks I’ve routed the first set of mortises. They are 2-1/2″ deep which is the capacity of my router bit. #flairww -4:00 PM Apr 30th, 2012

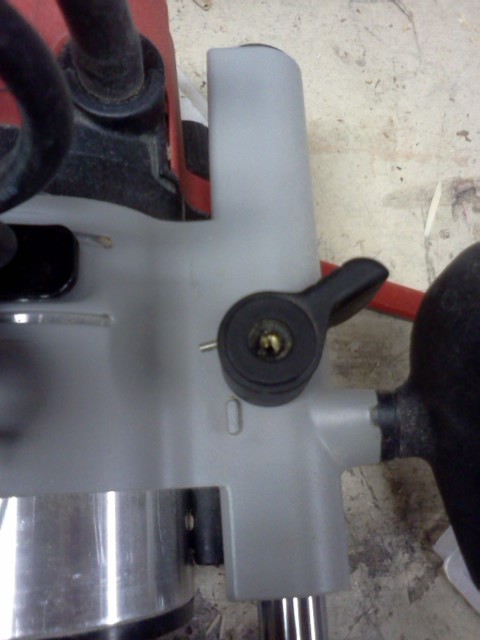
FlairWoodworks Unfortunately, my Milwaukee plunge router requires me to hold down a stiff plunge lock lever with my thumb in order to release the plunge lock. #flairww -4:01 PM Apr 30th, 2012
FlairWoodworks My thumb is quite sore after just three mortises… #flairww -4:01 PM Apr 30th, 2012
FlairWoodworks It was a fairly slow process to cut a mortise, too. #flairww -4:02 PM Apr 30th, 2012
FlairWoodworks And now I need to set up to rout the set of mortises on the other end of this slab. #flairww -4:05 PM Apr 30th, 2012
FlairWoodworks You can smell burnt wood from the friction of the non-fluted shank against the mortise walls. #flairww -4:06 PM Apr 30th, 2012
FlairWoodworks Oh, I forgot to mention that I’m using a 1/2″ diameter up-spiral router bit. I wouldn’t want to use a straight bit for deep mortises because they don’t clear chips as well. #flairww -4:07 PM Apr 30th, 2012
FlairWoodworks It took me over 2 minutes to rout each of the three mortises. #flairww -4:08 PM Apr 30th, 2012
FlairWoodworks I guess I’ll rout this set of mortises on my knees. #flairww -4:11 PM Apr 30th, 2012

FlairWoodworks I applied some DriCote to the router bit. It’s supposed to reduce friction and keep the bit clean. #flairww -4:15 PM Apr 30th, 2012

FlairWoodworks I’m going to see if I can defeat the sprung plunge lock on my router. #flairww -4:17 PM Apr 30th, 2012

FlairWoodworks There’s the culprit! Remove the spring and I’m a happy woodworker! #flairww -4:19 PM Apr 30th, 2012

FlairWoodworks I bolted the lever back on, positioned where it is comfortable to operate. Here the plunge is locked. #flairww -4:22 PM Apr 30th, 2012

FlairWoodworks And I push the lever down to plunge freely! #flairww -4:23 PM Apr 30th, 2012

FlairWoodworks I might have broken this handle when I knocked over the saw horse. #flairww -4:27 PM Apr 30th, 2012

FlairWoodworks Hmm… when the plunge mechanism is unlocked, there is noticeable play in one column. Before… #flairww -4:32 PM Apr 30th, 2012

FlairWoodworks … and after. I don’t know if you can see it, but I can see and feel it. Not good. #flairww -4:33 PM Apr 30th, 2012

FlairWoodworks My Porter Cable has some wiggle too. It’s not as much but still significant at the end of a bit protruding 2-1/2″ from the collet. #flairww-4:34 PM Apr 30th, 2012
malphrusoxide: if you want a better way to measure runout, chuck up a piece of round stock. less tricky to see/measure than a bit. -4:35 PM Apr 30th, 2012
FlairWoodworks @malphrusoxide Good idea, but it’s plenty clear when you see it in person. I’m evaluating my options right now. #flairww -4:37 PM Apr 30th, 2012
malphrusoxide @FlairWoodworks gotcha. got very little experience with rebuilding routers, but i know the feeling. good luck! -4:38 PM Apr 30th, 2012
FlairWoodworks @malphrusoxide I’m thinking upgrade, not rebuild. I don’t think it’s a wear issue becuse it has so little use. Blame tolerances. #flairww -4:39 PM Apr 30th, 2012
malphrusoxide @FlairWoodworks i did the same thing. went from old craftsman to new bosch. = night & day. -4:40 PM Apr 30th, 2012
FlairWoodworks Nice. #flairww RT @malphrusoxide: @FlairWoodworks i did the same thing. went from old craftsman to new bosch. = night & day. -4:41 PM Apr 30th, 2012
FlairWoodworks @malphrusoxide I have a Bosch 1617EVS plunge router somewhere… gonna find it and see how it feels. #flairww -4:42 PM Apr 30th, 2012
malphrusoxide @FlairWoodworks cool. forget which model bosch i ended up with. was working against a deadline so i didn’t get to shop around like i prefer. -4:43 PM Apr 30th, 2012
FlairWoodworks I have no idea where the plunge base is. I never change the Bosch 1617 bases because it is very difficult. #flairww-4:46 PM Apr 30th, 2012

DyamiPlotke: my local tool monger has a number of used 3HP PC plunge routers in stock now if you need a new one. -4:52 PM Apr 30th, 2012
FlairWoodworks I found the plunge base and managed to swap over the router without any drama. The plunge feels good! #flairww -4:53 PM Apr 30th, 2012

FlairWoodworks Are they good? #flairww RT @DyamiPlotke: my local tool monger has a number of used 3HP PC plunge routers in stock now if you need a new one. -4:54 PM Apr 30th, 2012
FlairWoodworks The Bosch 1617EVS plunges about 2-3/8″ so it might work.#flairww -4:56 PM Apr 30th, 2012
FlairWoodworks This table will be for sale when it is complete. E-mail me if you are interested. #flairww -5:03 PM Apr 30th, 2012
FlairWoodworks So far the cost is a Domino XL and OF1400 :) #flairww -5:04 PM Apr 30th, 2012
DyamiPlotke @FlairWoodworks I have 1 I bought used & like it equal 2 my Festool OF2000 Different feel but both very nice The PC is big & well balanced -5:05 PM Apr 30th, 2012
malphrusoxide @FlairWoodworks dominoXL v. domino… thoughts? worth the extra coin? -5:05 PM Apr 30th, 2012
FlairWoodworks @malphrusoxide Totally different applications. For me, the XL makes more sense. But I already have the DF-500. #flairww -5:08 PM Apr 30th, 2012
FlairWoodworks @malphrusoxide So for me, yes. #flairww -5:08 PM Apr 30th, 2012
FlairWoodworks To ensure the fence is positioned the same on my Bosch router, I first plunged the bit into an existing mortise. #flairww -5:16 PM Apr 30th, 2012

FlairWoodworks Ok… my Bosch router is now set up. Next question: does the switch work? #flairww -5:18 PM Apr 30th, 2012
FlairWoodworks Yes, it does work. #flairww -5:21 PM Apr 30th, 2012
FlairWoodworks Here goes… mortise set 2… #flairww -5:23 PM Apr 30th, 2012
This video showed how I routed the mortises. In this real-time video, I routed one of three mortises in this end of the slab. There were 12 mortises in total. (Duration – 3:07)
woodshaver101 @FlairWoodworks routing bits limit depth,but are precise,I tend to cut deep mortises with a mortise chisel. good luck -5:31 PM Apr 30th, 2012
FlairWoodworks … and… done that set of mortises! #flairww -5:34 PM Apr 30th, 2012
FlairWoodworks @woodshaver101 How long would a 3″ long, 1/2″ wide, and 2-1/2″ deep take you to chop by hand? #flairww -5:36 PM Apr 30th, 2012
FlairWoodworks So the second set of mortises took 10 minutes… about 30% longer than the first set. #flairww -5:38 PM Apr 30th, 2012
FlairWoodworks Before routing this mortise, I should check that it won’t go into this cavity. #flairww -5:43 PM Apr 30th, 2012

FlairWoodworks I moved the mortise in by 3/4″ to be safe. #flairww -5:48 PM Apr 30th, 2012

FlairWoodworks Since these pieces are a little awkward to turn upside-down to knock the sawdust out of the mortises, I’m using a stick to scoop chips towards the vacuum hose. #flairww -6:02 PM Apr 30th, 2012
FlairWoodworks Here’s the third set of mortises done. I added a 1/2″ deep haunch and will do the same with the others. #flairww -6:06 PM Apr 30th, 2012

BCcraftmaster @FlairWoodworks I have that same set up. Do you have problems getting the motor into the bases? Is the side of your motor all scratched up? -6:06 PM Apr 30th, 2012
FlairWoodworks @BCcraftmaster Yes and yes! I took some fine wet/dry paper (dry) and sanded the body smooth. It’s better but not great. #flairww -6:07 PM Apr 30th, 2012
FlairWoodworks The last mortise has been routed. Now I need to clear out the mortises and make floating tenons! #flairww -6:40 PM Apr 30th, 2012
FlairWoodworks My crevice nozzle, very conveniently, is a friction fit in the 1/2″ wide mortises. #flairww -6:41 PM Apr 30th, 2012
FlairWoodworks So the mortises I cut with my Milwaukee were 2-1/2″ deep and the mortises cut with my Bosch were only 2-1/8″ deep. #flairww -6:50 PM Apr 30th, 2012
FlairWoodworks I’m going to extend the bit further out of the collet (still with a full 1″ in the collet) and make the mortises deeper. #flairww -6:51 PM Apr 30th, 2012
FlairWoodworks Okay, NOW the routing is done. #flairww -7:05 PM Apr 30th, 2012
FlairWoodworks Like my Milwaukee, my Bosch also has a spring-loaded plunge lock. It’s not as stiff as the Milwaukee, but my thumb’s still sore.#flairww -7:06 PM Apr 30th, 2012
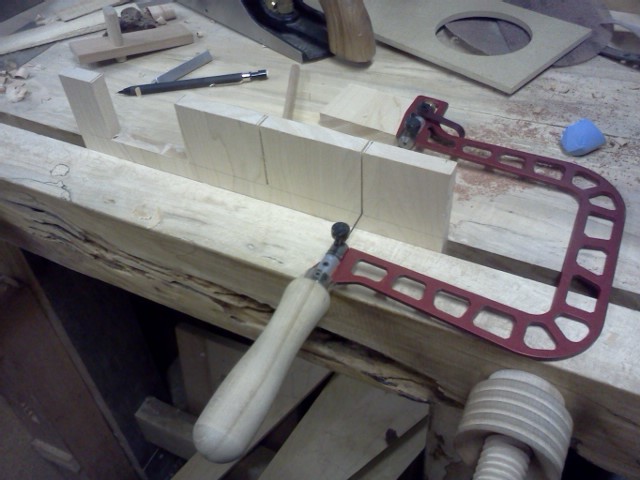
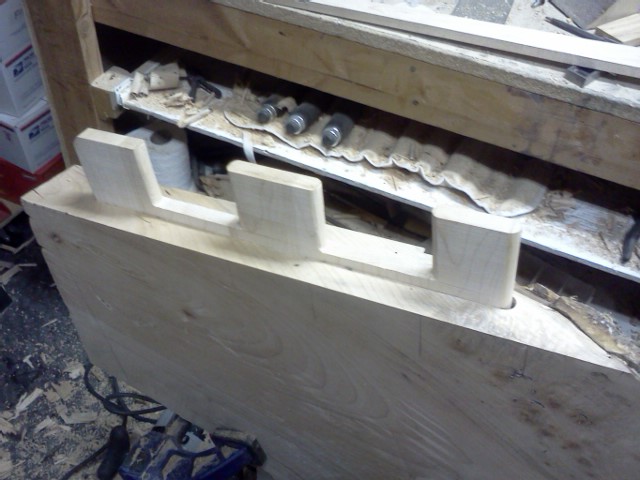
FlairWoodworks I found some maple for the floating tenons. The next step is to plane it to the correct thickness. #flairww -7:12 PM Apr 30th, 2012
FlairWoodworks To ensure the floating tenons were the right thickness, I planed a test piece ahead of the good stock. #flairww -7:59 PM Apr 30th, 2012
FlairWoodworks I then used the bandsaw to define the tenons. I’ll use a fret saw to finish the job. #flairww -8:00 PM Apr 30th, 2012
FlairWoodworks But first… dinner! #flairww -8:00 PM Apr 30th, 2012
woodshaver101 @FlairWoodworks that should hold good. -8:32 PM Apr 30th, 2012
woodshaver101 @FlairWoodworks about 5 min I’m a mortise cutting mad man -8:33 PM Apr 30th, 2012
FlairWoodworks That is really fast! Can you take a video? RT @woodshaver101: @FlairWoodworks about 5 min I’m a mortise cutting mad man -8:38 PM Apr 30th, 2012
FlairWoodworks I’m back in the shop finishing off the floating, haunched tenons. #flairww -9:04 PM Apr 30th, 2012
FlairWoodworks Here is one tenon complete and partially dry-fit. It’s a friction fit and will be a struggle to remove. #flairww -9:24 PM Apr 30th, 2012
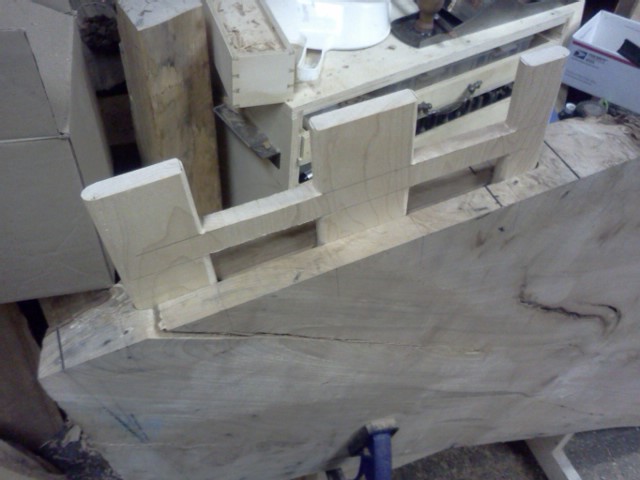
FlairWoodworks I’ve got the second floating haunched tenon cut as well. I think they need to be a bit thinner though. #flairww -9:39 PM Apr 30th, 2012

FlairWoodworks I ran the tenons through the thickness sander a few times to get it to the perfect thickness. #flairww -9:55 PM Apr 30th, 2012
FlairWoodworks That’s a big tenon! It makes XL Dominos look diminutive.#flairww -10:03 PM Apr 30th, 2012
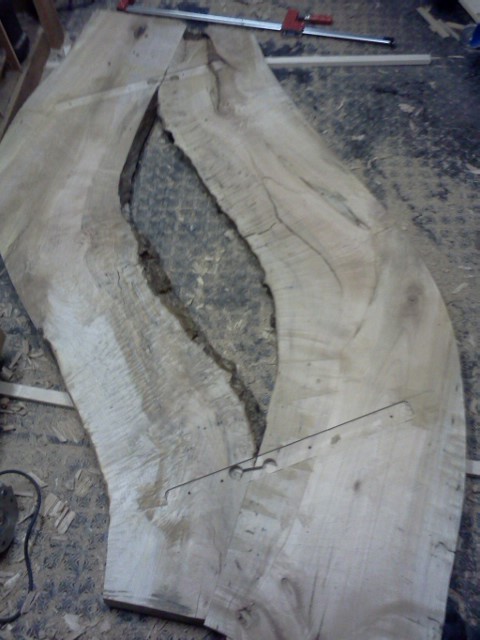
FlairWoodworks Now I get to put the two halves back together for a dry fit with the tenons! This is EXCITING! #flairww -10:07 PM Apr 30th, 2012
gvmcmillan @FlairWoodworks I always like dry fitting time – it’s when you really get to see if it’s going to work and what it will look like. #flairww -10:09 PM Apr 30th, 2012
FlairWoodworks @gvmcmillan I’m excited and nervous. Will my deadblow hammer be seeing a lot of work? #flairww -10:11 PM Apr 30th, 2012
HalfInchShy @FlairWoodworks you even make tenons outta slabs! :) nah no heavy work with the deadblow… you’ve thought of everything (I think :) #flairww -10:13 PM Apr 30th, 2012
FlairWoodworks @HalfInchShy Hey – this isn’t doll furniture! #flairww -10:15 PM Apr 30th, 2012
FlairWoodworks The deadblow hammer is for scale. If this doesn’t impress you, I want to see what you do! #flairww -10:17 PM Apr 30th, 2012
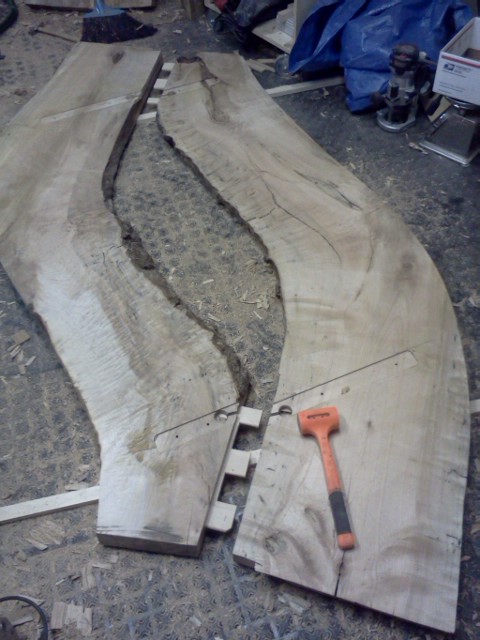
FlairWoodworks The first joint went together easily…. #flairww -10:19 PM Apr 30th, 2012

FlairWoodworks The second side is going to need some clamping pressure.#flairww -10:21 PM Apr 30th, 2012
FlairWoodworks I wish I had some really big clamps right now. #flairww -10:23 PM Apr 30th, 2012
luggermatt @FlairWoodworks Ratchet strap around the end? -10:24 PM Apr 30th, 2012
FlairWoodworks If it comes to that, maybe… #flairww RT @luggermatt:@FlairWoodworks Ratchet strap around the end? -10:25 PM Apr 30th, 2012
luggermatt @FlairWoodworks I use them a lot on the boat. Good for ‘encouraging’ big joints into place ;-) -10:26 PM Apr 30th, 2012
FlairWoodworks With one slab butted against my workbench which was butted against the wall, I was able to use my deadblow to close the joint. – 10:29 PM Apr 30, 2012
FlairWoodworks Next, the countertop connectors are installed and tightened.#flairww -10:35 PM Apr 30th, 2012
FlairWoodworks Then the battens are reinstalled… #flairww -10:40 PM Apr 30th, 2012
FlairWoodworks I feel like a kid on Christmas day! #flairww -10:40 PM Apr 30th, 2012
FlairWoodworks The dry-fit tenons worked brilliantly. There’s no more than a paper’s thickness in deviation between the two slabs on the surface. #flairww-10:45 PM Apr 30th, 2012
FlairWoodworks Now… should I glue it? #flairww -10:45 PM Apr 30th, 2012
FlairWoodworks I’m going to clean up the shop while I ponder that. #flairww-10:46 PM Apr 30th, 2012
HalfInchShy @FlairWoodworks yes :) #flairww -10:46 PM Apr 30th, 2012
FlairWoodworks You’re probably right. Might be an intense glue-up! I’ll have to get some slow-cure glue. RT @HalfInchShy: @FlairWoodworks yes :)#flairww -10:47 PM Apr 30th, 2012
HalfInchShy @FlairWoodworks Oh definitely a slow cure; do you have a slow-cure epoxy? #flairww -10:48 PM Apr 30th, 2012
FlairWoodworks 5-minute? Um… no. RT @HalfInchShy: @FlairWoodworks Oh definitely a slow cure; do you have a slow-cure epoxy? #flairww -10:49 PM Apr 30th, 2012
HalfInchShy @FlairWoodworks Glue the tenons into one slab then you can take your time to get the other in position; wet w/glue slab 2s mortises #flairww-10:56 PM Apr 30th, 2012
HalfInchShy @FlairWoodworks once in position but before pushing together, apply glue to the tenons then push like hell, man! #flairww -10:56 PM Apr 30th, 2012
FlairWoodworks @HalfInchShy That’s definitely how I’d do it! #flairww -10:58 PM Apr 30th, 2012
HalfInchShy @FlairWoodworks I hear my neighbors chanting ‘Chris!’ ‘Chris!’ ‘Chris!’ I think they want to see glue-up. Man up. :) #flairww -10:59 PM Apr 30th, 2012
FlairWoodworks @HalfInchShy Oh, you…. #flairww -10:59 PM Apr 30th, 2012
HalfInchShy @FlairWoodworks It was either that or a Canucks joke… #flairww-11:00 PM Apr 30th, 2012
FlairWoodworks @HalfInchShy I don’t think I actually need a slow-curing glue, thought it could make it less stressful if I have trouble. #flairww -11:01 PM Apr 30th, 2012
FlairWoodworks On edge, the table is up to my chest! #flairww -11:03 PM Apr 30th, 2012
luggermatt @FlairWoodworks Jolly good :-) -11:03 PM Apr 30th, 2012
HalfInchShy @FlairWoodworks Then do your other idea and mix your own TB Extended; first slab do as usual; second wet mortises with TB-Ex #flairww -11:03 PM Apr 30th, 2012
HalfInchShy @FlairWoodworks When you wet the tenons just before pushing it together, use normal TB; home-brew extended wont skin in the mortise#flairww -11:04 PM Apr 30th, 2012
HalfInchShy @FlairWoodworks Get your brother to snap a pic of the table on edge with you behind it or peeking through the center #flairww -11:04 PM Apr 30th, 2012
FlairWoodworks It’s not so easy to get this spring-loaded plunge-lock lever back reinstalled! #flairww -11:34 PM Apr 30th, 2012
FlairWoodworks Okay, it wasn’t that hard – it just took some lateral thinking.#flairww -11:36 PM Apr 30th, 2012
FlairWoodworks I’m done in the shop for the night. Now for some video and blog editing. #flairww -11:45 PM Apr 30th, 2012
The top is nearing completion. The legs and feet have yet to be started. What’s next? In Session 10, I began work on the legs!
I would be delighted if you left a comment.
Discover more from Products From The Mind of Chris Wong
Subscribe to get the latest posts sent to your email.

Looks excellent, Chris! Love the look of the table especially with the live edge to the inside and smooth to the outside. If shipping it wasn’t so nasty, I would have mailed you the Domizilla, I swear!
Nice work Chris ,I for one would get rid of the battens once the glue is dry they are not needed. Have you started the base yet?On to finishing the top first at least sealing it up I would imagine.
Cheers
Hi Dan,
Thanks for the comment. I’ve got the base started and the legs will attach to the battens, so they’re staying!
The top can’t be finished yet as I still have to cut the ends, do a final smoothing and decide if I want to add a profile to the outside edge. Maybe a Roman ogee? Just kidding. I do like bevels though…
Chris
Silly me ,should have known there was a bigger reason for the battens. have you decided on end shape? I was think copying the curves on either side to an end would be sweet.or a negative of the same natural curve??
Dano
Dano (I once read that names with two or more syllables indicated a higher level of class),
I had drawn a couple different end shapes – convex and straight. Right now I like the contrast offered by straight ends. I had not thought about a concave profile though.
Chris
I am particular to saving the chain saw cut :) but I looked at your pics session # 5 or so and thought that coping the sides and flipping then might be good, most all glad your not doing the round arch you had drawn out. and for sure go with the Roman Ogee!
Ps the Dan thing is Very Funny ;)
Hi Dan,
If you like the chainsaw cut that much, I’ll save the offcut for you :)
Chris
Like I have a lack of them ;) I guess you do not like the pieces i have done with that as a design feature ,but many do. You can make a crib board or something out of it ;)
That photo with the deadblow hammer really helps to put the table in to perspective. I mean, it looked quite big but, really, I had no idea!
Hey Chris.. I was wondering about seasonal movement of such a wide tenon sub structure.. Foot wide maple will move a bit… This may not be a problem if you have some lateral space in the mortices(mortises?:)
if you glue it, don’t you think the haunches areas will eventually split?
Hi Mike,
Great questions. I have answers, but it’s too difficult to explain without pictures. I’ll work on a post to explain my gluing strategy.
Chris
I look forward to it. My guess is pegging the tenons in side elongated holes, ala breadboard, as you previously mentioned..
Keep up the good work..oh yeah, is LV cutting back on staff? I waited 45 minutes in a near empty store the other day haha…
Not that I minded, but I started out with four items, and as I wandered around, I added 5 more things and 2 books.. Sales strategy perhaps haha?
Hey chris, how’s the table coming? I was wondering for the ends, if maybe a chicane, or shallow s curve might work, as the tables edges already flow like that. Just my 2 cents.
Hi Mike,
I had not considered an S curve. I have done that in the past with live edge slabs and I do like the look of it. I’m still leaning towards straight ends, but we’ll have to wait to see what happens.
Chris
Just follow your instincts and heart and it will be satisfyingly beautiful…I just spent 2 hours tuning up my tablesaw.. Finally I can cut some wood again haha…