

The push blocks that I use in the shop are not fancy, but they afford me excellent control and are cheap to make. I make half a dozen at a time and leave them around the shop at different machines. Besides being used as safety accessories, they also get abused as mallets, cauls, anvils, blocks, and more.
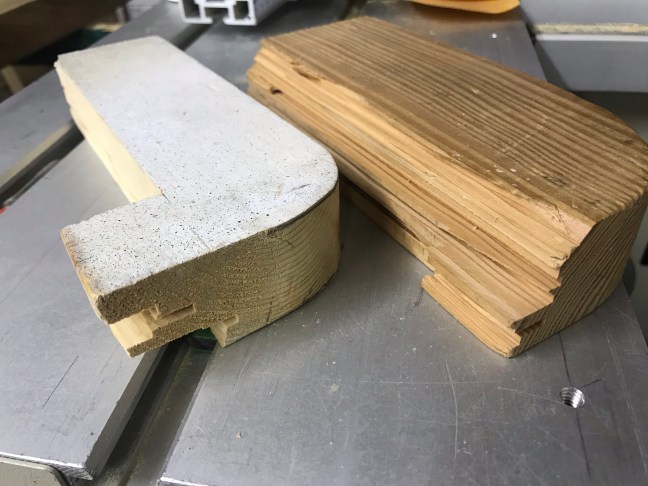
I start with a section of construction grade 2×4 about 8″ long. Using the bandsaw, I make a rip cut 1/2″ to 1″ from one edge (depending on the thickness of stock it will be used for), stopping about 1-1/2″ before I’m through. Then I make a second cut to complete the notch. I cut a curve on the backside of the block to make it more comfortable to use and give it a quick sanding to remove any splinters. That’s it.
The block works equally well to apply downward, or downward and forward pressure. When making narrow rips at the table saw, I keep the push block on top of the workpiece and tight against the fence, and pass it right through the blade.
When one gets cut up too much, I just toss it in the scrap wood box.
Discover more from Products From The Mind of Chris Wong
Subscribe to get the latest posts sent to your email.

So easy! Thanks Chris.
I have used the same style push blocks for years and still have all my fingers. Instead of wasting out for the notch: I glue a piece of 3/4 across the grain on the back end. When it gets chewed up, I rip off the whole bottom edge, glue on a new block and I’m back in business. I can repeat the process a few times. Maybe I’m just cheap!
Nice and timely project. I need some of these. Funny, the 12″ jointer in my high school shop (1985-ish) was a military surplus machine with 20 notches on the top of the fence. Our teacher would start the demo on this machine by removing the guard, turning it on, and then feeding a closet rod almost vertically into the cutter head as fast as he could. Then he told us the notches represented fingers lost. I about peed myself the first time I used that thing.