

Friday night, I went to down the shop because I wanted to build something. I started with a small slab of Western maple and designed the piece on the fly. I documented the build live on Twitter and what you see below are the updates from the second session (see what I did in the first session here). This was useful because each update had a time stamp so followers could see the rate at which I progressed.
(If you are not familiar with the format used on Twitter, every update, or “tweet” below starts with a username, being the author of that tweet. Sometimes, you see two or more usernames in a tweet. The second (and third, etc) usernames are preceded by a @ symbol and are people to whom the author is talking. The other symbol you see is #, which serves as a category. I try to remember to categorize all my tweets pertaining to this project under #flairww.)

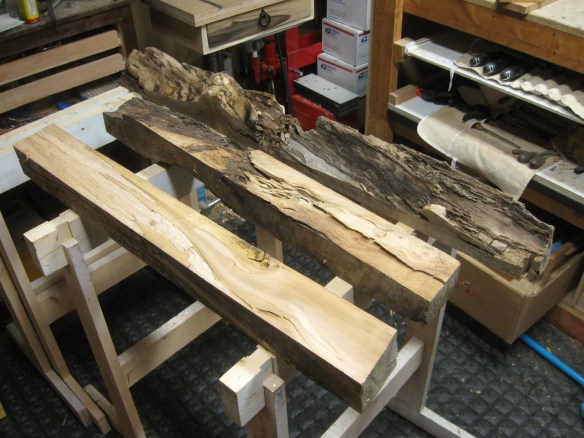
FlairWoodworks Back at it looking for materials for the table’s base. I like how this piece splits and rejoins. #flairww -1:04 PM Apr 7th, 2012

FlairWoodworks I need my sawhorses, but unfortunately, they’re being used to hold some special maple. A little help? #flairww -1:07 PM Apr 7th, 2012
ChrisHasFlair I create. Follow along with #flairww. -1:09 PM Apr 7th, 2012
FlairWoodworks Here’s another angle of the split. It is connected at both ends.#flairww -1:10 PM Apr 7th, 2012

FlairWoodworks Unfortunately, this fantastic piece with the split is a few inches wider than the top. That won’t do. #flairww -1:14 PM Apr 7th, 2012
FlairWoodworks I could skew the legs a bit so that their width fits completely under the top, but I’m not sure I like that idea. #flairww -1:15 PM Apr 7th, 2012
FlairWoodworks I could also just have the legs stick out beyond the edges of the table top but I don’t like that idea. #flairww -1:15 PM Apr 7th, 2012
FlairWoodworks Now I’m thinking about a very simple, clean stick-form base. Think Krenov cabinet stand. #flairww. -1:17 PM Apr 7th, 2012

FlairWoodworks Here are some of my choices for base materials. The bottom piece is live-edge maple, the rest are birch. #flairww -1:33 PM Apr 7th, 2012

FlairWoodworks I have to start thinking about how high I want this table to be. (I still think it’s going to be a table.) #flairww -1:34 PM Apr 7th, 2012
FlairWoodworks I like the contrast provided by the two boards on the right. However, the far right board has too much figure for legs. #flairww -1:40 PM Apr 7th, 2012

FlairWoodworks I mark the areas on both sides that are unacceptable. That helps me realize how much material I really have. #flairww -1:47 PM Apr 7th, 2012

FlairWoodworks From the board, I milled these four pieces. They are about 1-1/4″ square (the size doesn’t really matter). #flairww -2:12 PM Apr 7th, 2012

FlairWoodworks From these four pieces, I will cut 4 legs, 2 short stretchers and 1 long stretcher. Or maybe 4 legs and 4 short stretchers. #flairww -2:13 PM Apr 7th, 2012
FlairWoodworks Is anybody following along right now? #flairww -2:14 PM Apr 7th, 2012
FlairWoodworks Huh. Upon closer examination, I can get 4 legs, 4 short stretchers and 1 long stretcher! #flairww -2:16 PM Apr 7th, 2012
sharpendwood Yep! RT @FlairWoodworks Is anybody following along right now? #flairww -2:22 PM Apr 7th, 2012
FlairWoodworks My next step is to determine what I will use for joinery.#flairww -2:22 PM Apr 7th, 2012
FlairWoodworks Awesome! What are your thougths so far? RT@sharpendwood: Yep! RT @FlairWoodworks Is anybody following along right now? #flairww -2:23 PM Apr 7th, 2012
FlairWoodworks Have you ever had your planer leave a high spot? I haven’t until now! #flairww -2:26 PM Apr 7th, 2012

BCcraftmaster @FlairWoodworks let the split dictate the shape.. play off of that -2:25 PM Apr 7th, 2012
FlairWoodworks @BCcraftmaster I decided that piece wasn’t suitable for this table. It deserves to be the centerpiece, not just a set of legs. #flairww -2:27 PM Apr 7th, 2012
FlairWoodworks 18″ is the standard height for a coffee table. Should I follow that rule? #flairww -2:31 PM Apr 7th, 2012
FlairWoodworks Excuse me while I go sit on the couch and ponder that last question. #flairww #WorkIsTough -2:32 PM Apr 7th, 2012
sharpendwood @FlairWoodworks Liking it. Are you adding any curves to the legs? -2:32 PM Apr 7th, 2012
FlairWoodworks @sharpendwood So far they are straight. I’ll do all the joinery while they’re straight, but once assembled I can go crazy. #flairww -2:33 PM Apr 7th, 2012
FlairWoodworks Couches are getting taller and taller. 18″ seems a little low so I’m going to make my table 20″ high. Or should I make it 21″ high? #flairww-2:35 PM Apr 7th, 2012
FlairWoodworks The top’s just over 2″ thick so I’m going to cut the legs 19″ long. I can always recut them later. #flairww -2:37 PM Apr 7th, 2012
Morton @FlairWoodworks domino for joinery :) #flairww -2:42 PM Apr 7th, 2012
FlairWoodworks Rift-sawn material is ideal for legs because it exhibits vertical grain on all four sides. #flairww -2:42 PM Apr 7th, 2012

FlairWoodworks You read my mind! Yes, I’ll be using 10mm x 50mm Dominoes for joinery. RT @Morton: @FlairWoodworks domino for joinery :)#flairww -2:43 PM Apr 7th, 2012
FlairWoodworks Before I get to joinery, I need to cut the short stretchers. One end of the table is 9-1/2″ wide, the other 11″. #flairww -2:45 PM Apr 7th, 2012
FlairWoodworks I use a short fence as a stop to accurately cut the stretches to length. (I’ve never liked mitre gauges!) #flairww -2:53 PM Apr 7th, 2012

FlairWoodworks I’m trying to figure out how to register the Domino to cut joinery on 1-1/4″ square stock. Wish I had these: #flairww -3:02 PM Apr 7th, 2012

ChrisHasFlair I think I’ll just use pencil marks and line it up manually. Unless someone has a better idea… #flairww -3:03 PM Apr 7th, 2012
FlairWoodworks Here’s my test piece with two 8mm mortises 25mm deep. I readjusted to have the mortises better centered. #flairww -3:13 PM Apr 7th, 2012

FlairWoodworks It is difficult to balance the Domino joiner on a single leg so I use the others for additional support. #flairww -3:33 PM Apr 7th, 2012

FlairWoodworks I checked that had cut all the lower mortises before adjusting the Domino Joiner to cut the upper mortises. #flairww -3:40 PM Apr 7th, 2012

FlairWoodworks Clear the bench for a glue-up! #flairww -3:50 PM Apr 7th, 2012
FlairWoodworks One side glued up… #flairww -4:03 PM Apr 7th, 2012

FlairWoodworks Both glue-ups are done. Now I need to get ready to go to dinner. I might be back in the shop tonight. #flairww -4:10 PM Apr 7th, 2012

FlairWoodworks I’m actually going for dinner with my friend, Dave, who milled the wood so I thought I should get a picture. #flairww -4:22 PM Apr 7th, 2012

FlairWoodworks The stretcher would at least be cut shorter. Or I may use something completely different for the stretcher. Or make it a shelf. #flairww-4:23 PM Apr 7th, 2012
Morton @FlairWoodworks Do something different. Use a bent or live-edge piece, vertical or horizontal. Keep it fun!-5:17 PM Apr 7th, 2012
FlairWoodworks I’m back in the shop fitting the legs. I used a pencil to transfer the shape of the top to the legs. #flairww -10:52 PM Apr 7th, 2012

FlairWoodworks A bevel along the top edge of the leg assemblies disguises any minor variances. #flairww -11:34 PM Apr 7th, 2012

FlairWoodworks I should have drilled this hole with the drill press before assembly. It would have been easier. #flairww -11:40 PM Apr 7th, 2012

FlairWoodworks The manual countersink doesn’t work as quickly or as well as a drill-powered one, but I still like using it. #flairww -11:46 PM Apr 7th, 2012

FlairWoodworks I’m not quite happy with this stretcher. It feels lacking. It’s the last component (and therefore the next step) so now I must think. #flairww -12:44 AM Apr 8th, 2012

FlairWoodworks Hmm… this has potential. It’s a form I used to laminate curved arms for a Morris chair I built in grade 11. #flairww -12:56 AM Apr 8th, 2012

FlairWoodworks Here is the stretcher I’ve started. Tomorrow, I’ll pillow the ends and install it. #flairww -1:19 AM Apr 8th, 2012

Sc0FF @FlairWoodworks did you fill the check in the top or is the picture playing tricks on me? #flairww -5:14 AM Apr 8th, 2012
BCcraftmaster @FlairWoodworks looking good. The pics make it look tall. You said 21″ right? Looks like 36″ in the pics -5:32 AM Apr 8th, 2012
FlairWoodworks No, it’s just the picture. RT @Sc0FF: @FlairWoodworks did you fill the check in the top or is the picture playing tricks on me? #flairww -10:24 AM Apr 8th, 2012
FlairWoodworks Yes, 21″ tall. RT @BCcraftmaster: @FlairWoodworks looking good. The pics make it look tall. You said 21″ right? Looks like 36″ in the pics-10:25 AM Apr 8th, 2012
FlairWoodworks A great comment on the tabletop: http://t.co/R8aIJx7k#flairww -12:00 PM Apr 8th, 2012
Session 3 starts with shaping of the stretcher.
Discover more from Products From The Mind of Chris Wong
Subscribe to get the latest posts sent to your email.

4 thoughts on “Maple Slab Build, Session 2”