

Being able to cut a dovetail joint using only hand tools has become recognized as a level of achievement. But there are other reasons to learn how to cut joinery by hand besides proving yourself and, for me, the biggest reason is being able to deal with unique situations.
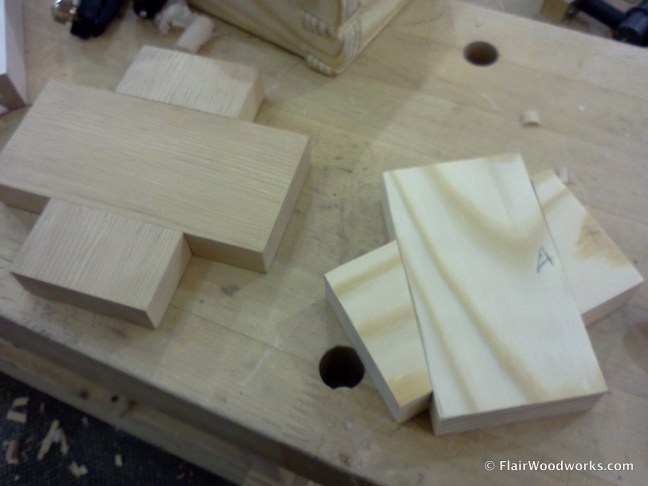
The joint below on the left is a cross lap joint. Where they intersect, both pieces have half of their thickness removed. This is a very strong and easy joint to cut with either hand or power tools.
However, when dealing with angled components, as seen at the right, or even tapered parts, setting up to cut the joint with power tools gets increasingly complicated and time-consuming.
With hand tools, the procedure is the same and the process is practically the same. No additional tools or jigs are required and the joint takes the same amount of time to cut. What’s more, the hand tools required to cut this joint (and most joints, for that matter) cost less than the price of a good table saw blade.
Learn to Cut Joinery Under My Guidance
This Saturday, I am teaching a seminar at Lee Valley Tools Coquitlam on Fundamentals of Hand Tool Joinery. We start with stock preparation, which cannot be overlooked when cutting fine joinery, then cut an air-tight cross lap joint using a simple, reliable method. I want everybody to leave with the knowledge required to confidently execute crisp joinery and a small project proving that they can.
If You Master the Basics, the Hardest Part of Joinery is Layout
Once the basics are mastered, the possibilities are endless. You might try dovetails, then half-blind and full-blind dovetails.

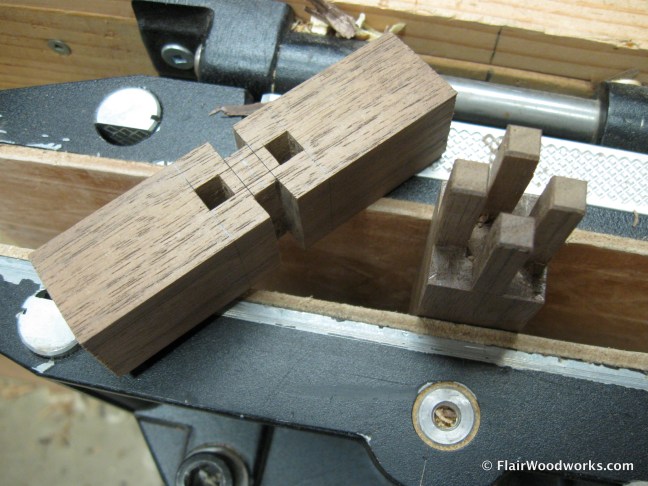
You might try mortise and tenon, monster mortise and tenon, or multi-mortise and tenon joints.
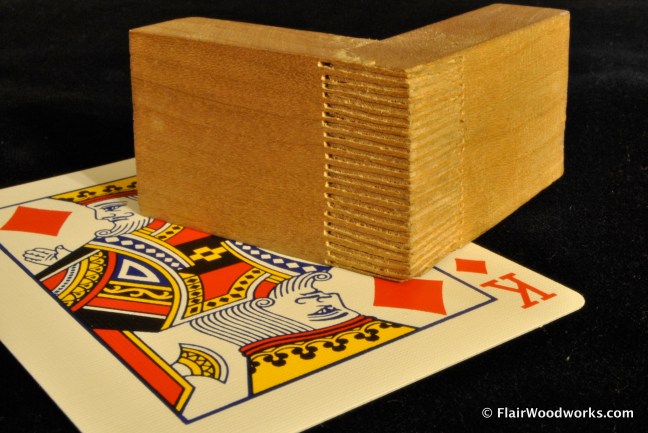
You might try the insane-looking, but quick-to-cut saw-kerf finger joint.
You might design a table base with lots of intertwined components that requires serious head-scratching to even engineer the joinery that makes it possible.

You may also attempt to cut joints on curved or round components. Learn and master the basics of cutting joinery by hand. Then, no matter what you attempt, remember that the hardest part is accurately laying out the joint. I think that joinery is one thing that is best learned by doing, not by reading and watching.
(If you want to see some really artistic joinery, have a look at the original joinery by Kintaro Yazawa.)
Links:
- Fundamentals of Hand Tool Joinery seminar at Lee Valley Tools Coquitlam
- Practice and Experimentation with Joinery – FlairWoodworks.com blog post
- V-Table on FlairWoodworks.com
- Kintaro Yazawa’s Original Joint Work
Discover more from Products From The Mind of Chris Wong
Subscribe to get the latest posts sent to your email.

AMEN!
Love Kintaro Yazawa’s work, the back cover he had on FWW a few years with accompanying article was definitely a page turning moment in my WWorking vision and life.
I assume the 4 prong M&T joint has Asian origins, is there an advantage of this over a more traditional western type? (nice vise there btw, LV Tucker right?) Do you have any book recommendations on Asian joinery?
JMAW,
Is the article to which you’re referring the one where he showed how to cut letters in the ends of tenons and have them protrude through the bottom of the mortise, like this?
(Image from Practice & Experimentation with Joinery)
I have no idea whether the quadruple tenon is original or not and I just invented(?) it one day in the shop four years ago; I don’t have any book recommendations on Asian joinery, but I’m sure that Chris Hall (blog: the Carpentry Way) would have a suggestion.
I actually made tenons in several arrangements which I have not shared but will in a future post. I want to make a table or cabinet base using this type of joinery. These joints are slightly more difficult and considerably more time-consuming to cut than standard mortise and tenons joints but they offer the benefits of more glue surface and narrower tenons, so less chance of a gap appearing due to wood movement. Because they are smaller, they are also more prone to breaking. I do believe I broke one of the four tenons on one attempt.
Yep, I love the Tucker Vise.
Chris
Yep that’s the article I was referencing,at the time, the photos of his other work or his website really opened up my view of how joinery could go beyond arts&crafts “on display” to taking center stage.
I like your 4 post M&T, I’d think it’d a bit challenging to get the center section out of the tenon piece?
Also great work on your “wish!”; it looks great. one of these days I’m going to spend a week off just doing joints for no purpose other than cutting them. Or maybe instead of the 100 dovetail in 100 days project, do all the joints in Charles Hayward’s book or something like that.
–Jeremy
Well put, Chris. I have recently begun forms where the benefits of hand cut/chopped become clearer. Have a great time at your Lee Valley event. See you at WIA.
Tom,
Thanks for the comment. At this point, I don’t have any plans to attend WIA this year.
Chris
I saw that article in FWW also and loved that they showed how to make the joints. I probably never would have figured it out otherwise.
I wish I could take a class from you, Chris. You want to come to Arizona this winter? It’ll be 60 degrees Farenheit in the middle of January?
Greg,
Yes.
Chris
Sweet. Get a passport and I’ll see what I can do to bring you here.
Greg,
Cool. I’ve already got a passport. (I went to Portland for the Bridge City museum exhibit this year instead of Cincinnati for WIA.
Chris
I cut much of my joinery by hand. Most of the time it seems like less of a hassle to me. But I have nothing against using power tools to do it. When sawing a tenon, I will sometimes use the table saw to define the cheeks, but I always finish with a hand saw. This is particularly helpful if you have a lot of tenons to saw, at least for me.
Bill,
Your method seems very practical. Me? I would cut the tenon entirely by power tools, but use hand tools to clean up and tune the joint if required – especially when parts of it will be visible (e.g. tusk tenon).
Chris